Insights from 45 Years in the Field
When it comes to trench excavation, cost is never just a simple “per metre” equation. After nearly 45 years in the earthmoving business, we at Dial A Digger have seen firsthand how each project is unique. Let’s break down the factors that shape your trenching costs—and how you can avoid surprise expenses. If your project involves utilities like power or communications, our trenching for services page explains how we safely handle electrical and service installations from start to finish.
The Key Factors Affecting Trenching Costs
In my experience, three factors stand out as the biggest drivers of cost:
1. Trench Dimensions (Length, Depth, and Width)
The total length, depth, and width of your trench are the primary cost factors. A longer trench takes more time and equipment; a deeper or wider trench demands more labour and safety measures.
2. Ground Conditions and Site Access
Where we dig matters. Is it a simple lawn, or is it an old concrete driveway? Is the trench around a building or a tight access area? Poor access or unexpected obstacles—like rock or concrete—can quickly increase costs.
3. Reinstatement and Backfilling
Many homeowners often forget that once the trench is dug, it needs to be backfilled, compacted, and sometimes re-landscaped. Depending on the project, this can add significant time and cost.
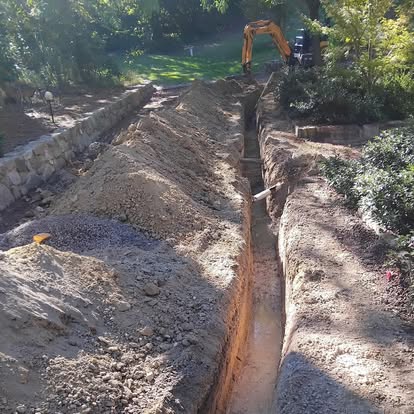
A Real-World Example: Power Line Under a Stone Driveway
One of our recent projects involved trenching to bring power from a house under a stone driveway—about 50 metres in length. Working closely with an electrician, we quickly realized this wasn’t just a simple dig. We had to carefully trench under the stone, expose both ends, and leave them accessible for the electrician to do his connections. Thanks to our experience, we balanced speed with safety—backfilling once the conduit was in place, so the driveway remained fully usable.
Why a “Per Metre” Price Is Misleading
When customers ask, “How much does trench excavation cost per metre?”—we have to be honest: it’s a starting point, but not a complete picture. We have a minimum charge that covers the travel and the first few hours of work—often three to four. After that, we work on an hourly rate. Before quoting, we need to know site access, whether reinstatement is required, and any other trades involved. That upfront clarity avoids sticker shock.
A Case Study to Remember
Let me share a success story. Recently, we tackled a job where we had to trench a conduit under a stone driveway. Access was tricky, and we needed to coordinate with the electrician. By using our decades of experience, we knew to trench safely around other services, hand-digging where needed, and leaving the ends exposed. The job was completed on time, and the driveway was ready for use—all without any hidden surprises.
My Top Advice Before You Start
Before you kick off your trenching project, I always recommend a couple of things. First, take photos of your site—this helps us see access points and potential challenges early. Second, consider hiring a professional underground locating service. Most people don’t know exactly where their cables or pipes run, and identifying them early prevents costly mistakes.
By keeping these insights in mind, you’ll be better equipped to plan and budget for your trenching project—no matter how big or small.